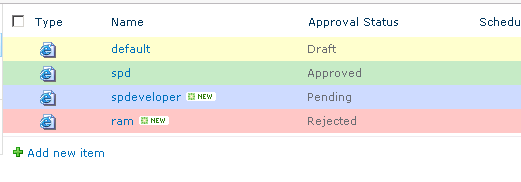
We know that SharePoint 2010 comes with a flashy UI, but we sometimes want to add more color to the UI of Sharepoint. Most of us must be creating pages in a SharePoint portal, which are stored in the 'Pages' library of the site. When we enable the 'Content Approval' feature on a 'Pages' library, we see the Approval Status coming up for the pages. Can we have different background colors for the items based on their Approval Status? The answer is yes. SharePoint 2010 gives us the privilege to do this. The Approval Status of page can be in many states like 'Draft', 'Pending', 'Rejected' etc., It looks good when we have different background colors based on these values, like a rejected item will have a red background and a approved item will have a green background. Using this example I will explain how we can do conditional formatting on a ListViewWebpart. At the end of the article we have a View for the Pages library which looks like the screen shown below
We can do this type of formatting to the ListView WebPart using SharePoint Designer. Following are the detailed steps for doing this.
- Open your site through Microsoft SharePoint Designer 2010
- Once the site is opened, on the left side,under 'Site Objects' you will find all the objects listed.
- Select 'Lists and Libraries' from this section, this opens all the lists and libraries in the right side panel. From this select the 'Pages' library
- This opens a panel which shoes all the information related to the Pages librray, which are grouped into categories like List Information, Views, Customization, Settings, Forms, Content Types etc.,
- In the 'Views' category click on the New button and create a view named 'My Views' (or any other which you feel appropriate)
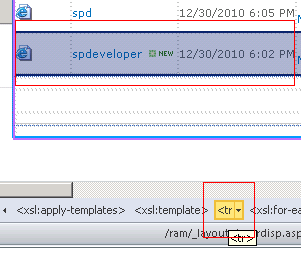
- This opens the page with a ListView Webpart which shows the list of pages. Now click on this webpart area and select a row of this webpart. (You can easily select a row by clicking on the <tr> element in the status bar. Refer the screenshot below)
- After selecting the row, right click on the row and select the 'Conditional Formatting' option from the menu opened. This opens 'Conditional Formatting' panel at the right side of the window. Click on Create and select the 'Apply Formatting' button. this opens a window as shown below.
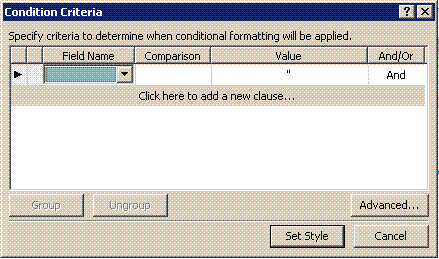
- In this window select the Field Name as 'Approval Status', and Comparision as Equals and Value as Approved, and click on 'Set Style'. This opens a window, through which we can specify styles for the elemen (in our scenario, its the complete row.)
- In this window, select the 'Background' group and give the 'Background Color' as '##C5E9C0'. Now select Border group and give the details as shown in the screen shot below

- Click on OK. Now click on 'Create' button again and select 'Apply Formatting'. In the window that opens, select appropriate values as we did earlier and give the Value as 'Rejected', set the 'Background' color to '#FFC4C4', and set the 'Border' properties as shown below

- Create one more condition for 'Draft', with 'Background' as '#FFFFCA' and 'Border' properties as shown below

- Create one more condition for 'Pending', with 'Background' as '#CEDBFF' and 'Border' properties as shown below

Save this view and try to open this view from your browser. The pages should have appropriate backgrounds depending on the 'Approval Status' as shown in the screen at the begining of this article..